What 700x25 RoadTubeless tyre for my road bike?

15 Feb 2017

Sub 11 Kg Dahon Mu P8

Side view of white Dahon mu p8 indoors
Dahon Mu p8 with all the latest upgrades now weighs less than 11Kg


My Dahon Mu P8 has been in service for over 5 years now.
It has now covered over 1000 miles in total, and it has required very minimal maintenance.

All of the modifications to the original specs have in the past included brakes, saddle and winter tyres. I also published about hints and tips to make life with the Dahon Mu P8 a breeze.

Those were the only changes I needed to make to increase the practicality and performance of my Mu P8 until 2014, when things changed.

I got a new job and my commute hasn't involved trains since.

This gave me the opportunity to make a few performance improvements aimed at reducing rolling resistance, increase efficiency, improve the gearing and make the bike lighter.

First of all, this latest version tips the scale at 10.8 Kg.

That means it's light enough to be taken into consideration as a substitute for a road bike when space is at premium, such as when travelling by plane or train over long distances.

It is also a much better looking bike, something not to hide in a corner but to put on show. It can now rival a Brompton.

But let's go through the list of improvements, one by one.


1) Remove rack and mudguards

Folded dahon mu p8 pictured from the side
Removing mudguards and rack really makes the bike sleeker, even when folded

This was not an easy decision to live with: without a rack, my only option is now to carry items in a rucksack.

But even more importantly, without mudguards there's a risk I will get wet from the back down, and that grime will foul the seat post.

I still haven't found a solution that I am happy with at the moment, so I decided I will only use my Mu P8 when the roads are dry.

Although I found something that might be worth it while browsing the web: the Zefal No Mud universal mudguards. I might have to give them a try.

2) Clipless pedals


Shimano M424 pedals fitted to a Dahon Mu P8
Shimano M424 SPD pedals improve power transfer 

Originally I was considering a set of removable clipless pedals, like the MKS Ezy mm-Cube.

Unfortunately my budget wasn't allowing me to, so I decided to use a set of pedals I already had for touring, the Shimano A530.

That was a big mistake, since the flat part of the pedal is too slippery when wet, and I once went over the handle bars at a junction in London when my right foot slipped off the pedal while accelerating hard.

Since then, I have used these Shimano M424. They are not the lightest at over 500 grams, but are the safest I have used.
I might consider using SPD-SL pedals in the future since they provide a large enough platform to work with flat shoes, and normally weigh around 300 grams.

4) Grips


Ergon GC2 grips from the side fitted to Dahon Mu P8
Ergon GC2 grips make aggressive riding more comfortable

Although the original Dahon grips were ergonomic, they lacked something when riding really fast: they were essentially not allowing a more aerodynamic riding position, torso flat with the ground, without discomfort, just like any flat bar grips.

These, the Ergon GC2 (now superseded by the Ergon GP2) provide enough of a bar end extension, to allow a more aggressive riding style and out of the saddle comfort. They also don't interfere with the folding mechanism being pretty compact.

5) Narrow tyres


Schwalbe Durano P 20x1.10 fitted to Kinetix wheels
Schwalbe Durano P 20x1.10 are fast, grippy and light.

The original Schwalbe Marathon Supreme 20x1.6 were excellent tyres, reliable (only one puncture in their lifetime on the streets of London) and probably still the best for this bike, since they allow lower inflation pressures and therefore greater comfort.

But, they weren't the fastest! These are! The Schwalbe Durano P 20x1.10

At 27 mm wide on the original Dahon Kinetix rims, they are light, grippy and fast. The Dahon Mu P8 now feels very similar to a Brompton, although maybe a little less precise due to the inherent flex in the steering column.

I inflate them to 60 PSI at the front and 80 PSI at the rear; this gives me the best balance between speed and comfort on British roads.

The ride is not too harsh, but you must pay more attention to the road conditions, in particular potholes. Since my primary use for this bike now is training rides when away for business, I really do think it is a price worth paying.

Finally) 9 Speed derailer and trigger shifter


Shimano Sora 9 speed derailer is reliable, fold after fold.
Deore trigger shifters are smooth and precise

I replaced the original and admittedly unreliable Neos 2.0 derailer and grip shifters, with a Shimano Sora rear derailer and Deore triggers.

This has made the biggest difference in terms of power transfer.

Going from 8 to 9 speed hasn't made a huge difference, although the more compact cassette (11-28T) now means smaller jumps between ratios, yet retaining a wide enough gear spread.

What had the biggest impact has been the more reliable shifting system provided by the Shimano road system.

The Sora derailer, the entry level of road components in the Shimano lineup, really does deliver consistent shifts fold after fold. There is no need to fiddle with the barrell adjuster anymore, and the trigger shifter delivers very crisps gear selections with minimal input.

Luckily again, this has not adversely impacted the bike folding mechanism.

A compact fold is still possible if using a short cage road derailer.

The derailer is  compact enough a sits pretty tight against the frame, therefore still allowing a compact footprint and reducing the chances of damage when storing the bike on its side or against a wall.

To be able to fit the new derailer a couple of modifications had to be made.

The first one was to fit a compatible derailer hanger (on the right in the picture below) in place of the face plate fitted at the factory (on the left in the picture below).

Not all Dahon bikes allow a derailer hanger to be fitted. The Mu P8 does.

For reference, I found the derailer hanger by visiting gearmechhanger.com and buying a D24 cast hanger.

The second modification was to take advantage of the hole left by removing the Neos derailer, and to clip the shifter cable to the frame: this allows the cable to follow a natural path to the derailer and won't foul the folding mechanism.

Routing the cable only requires a zip tie.

Conclusion


All of the above was absolutely unnecessary, but just so worth it!


14 Feb 2017

Coffee detox plan

A glass of water from above
Not a cup of coffee.

I love coffee.

I grew up in Italy, a country where a coffee grinder and espresso machine is as popular in the kitchen as a kettle is in Britain.

Over the years I've learnt to love the different varieties and flavours.

And as cyclists, it becomes part of our lifestyle.

But there's a point where too much coffee is bad for you.

If you, like me, think you have hit that point (6 espresso's a day?) then I'll share the ingredients to my detox cure for coffee addiction.

Ingredient one: water.


A glass of water next to a laptop
Water, the single most important ingredient for a successful detox.

Plenty of it. So much that for the first few days you will be urinating a lot and feel bloated perhaps.

You don't need to drink so much as to be ill but for a couple of days at the start of your detox programme, you need to be fully hydrated to cope with the withdrawal symptoms of not drinking coffee.

Oh yes, I forgot to mention this: while detoxing you must not drink coffee.

You will have bad headaches, probably in the middle of the day, when your focus is most needed. And when the temptation to reach for the espresso machine is the strongest.

Drinking a lot of water at this critical stage will help your body recover quicker from the headaches.

The second ingredient: will power.


A glass of water and a banana next to a laptop
Spice up that glass of water with your favourite power snack.

That's not to say you are not allowed any coffee at all. But you must have a plan and stick to it.

My plan when weaning off an addictive substance or activity (bike maintenance can be very addictive), is to half it every day.


When I recently detoxed from 6 espresso's a day, this was my plan:

Day 1) Drink plenty of water but still have up to 6 espresso's.


Day 2) While drinking more water still, now only allow up to 3 espresso's.


Day 3) Only have 2 espresso's.

Day 4) 1 espresso and we call it a day

Day 5) What's espresso


Visualisation

If it helps you, when you need that extra cup, close your eyes, and imagine you make yourself a virtual espresso, sip it, taste it, and recall the sensation of coffee on your tongue and your throat.

For advanced detox

Apply the virtual coffee making exercise as above, but instead of drinking the coffee, throw it away. This will reinforce the message in your mind that coffee is bad for you.


Meditation

In order to get a good night sleep while detoxing, and even afterwards, why not try my suggested meditation for cyclists?

8 Feb 2017

Meditation for Cyclists

Before going to sleep tonight, I'm going to listen to the Emerald Waterfall Meditation by Master Co.

Just visit http://pranichealing.com/emerald-waterfall-meditation

Listen to the guided meditation, and you will have a better rest tonight.

Through this guided meditation you will experience a full body relaxation and deep energetic cleansing using green prana.


If you use any Health apps such as Sleep Cycle or Instant Heart Rate, you can probably track your sleeping profile and heart rate over the next few nights and days, and hopefully will find a much better sleeping quality, and a lower heart rate too as a result.


two health related apps from app store
Two example health apps

I certainly have, and the metrics in Sleep Cycle confirm that for me.


Sleep Cycle showing a graph of sleep pattern after a meditation


Even though I drank tea and coffee and had a stressful day at work, instead of having a restless night, I was able to fall asleep quickly and get some real quality sleep

Try it. You'll thank me later.

Goodnight.


Note: even on an iOS device you can simply go this link and listen to the guided meditation without downloading the file.

7 Feb 2017

Exercise routine for cyclists - Day 3

I haven't exercised properly since the last time I posted about my exercise routine and today, due to a very stressful time at work and home.

I won't go into details of my personal life, nor my work life, but I am pleased to say today I started exercising again!

Now, before I post about the routine, let's just mention that a recent study has found people who post their exercise routines on Facebook have psychological problems. Oh well...

So here it goes. Obviously I needed to get some total body exercise routine and my Day 3 routine on VT Vipr looks like this:


The reason for having some exercises appear twice in the list is to take into account the left/right alternation: I do one set with say the left leg/arm, and the next set of the same exercise with the right leg/arm.


I set the app to run three sets of each exercise, 30 seconds in duration, with 30 seconds rest.

I used the 8Kg ViPR for the jumps and Ice Skater, and the 4Kg ViPR for the rest of the routine, which was heavier on the arms and shoulders.

At 23 minutes in duration, this was a good workout.

I have also decided that instead of performing these routines in the morning, I will perform them mostly in the evening before bed. This should ensure I actually fall asleep quicker and get a better rest for the morning.

5 Feb 2017

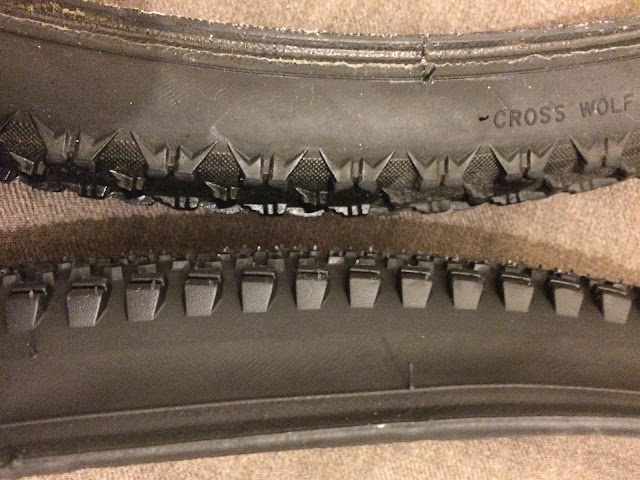
WTB tubeless cyclocross tyres: Cross Wolf vs Riddler 37c

Riddler 37c and Cross Wolf side to side
Now the cyclocross season is over here in the UK, the spring/summer 'gravel grinder' season is looming.

The drier, harder ground makes skinny knobby cyclocross tyres perform quite badly. With little to no mud to shed, there's very little point in aggressive treads.

My cyclocross bike, a 2016 Vitus Energie CX, came equipped with a set of tubeless WTB rims and tyres: the WTB Frequency i19 Team CX shod with WTB Cross Wolf tyres.

The WTB Cross Wolf is 32mm wide and leaves plenty of clearance around
The WTB Cross Wolf is 32mm wide and leaves plenty of clearance around 

These tyres performed really well throughout the Wessex CX League season, from the early dry races in September, to the muddy December and January days.

I could race them tubeless at quite low pressure (20 psi at the front, 23 psi at the rear) on really muddy courses, and up to 30 psi on the faster dry courses. They are very narrow though, at 32mm wide, and don't like tarmac nor rubble. On tarmac their soft centre knobs tend to squirm a little when the tyre pressure is in the 30 psi range, and on rubble they are too narrow and will allow stones and rocks to hit the rim quite hard.
Having said all of that, they actually proved reliable during the Badlands CX Sportive, a demanding course for any CX tyre,

But that very sportive made me wish for something more gravel oriented. In particular, I was also looking for a tyre compatible with the conditions I am likely to find at the next gravel race in May, the Battle in the Bowl.

More volume and a less aggressive tread, that will fit within the clearance of my current bike.

I found all of the above in the WTB Riddler 37c.

The WTB Riddler 37c in its original packaging


This is a tubeless tyre that is wide enough for summer cyclocross, with a fast micro knob centre tread, ideal for fast fire roads and pavement, yet equipped with aggressive side knobs to dig into the ground during the hard cornering of cyclocross. On top of that, at 37mm wide, they will fit most cyclocross frames, especially when mud is not on the cards.

The WTB Riddler 37c should fit most cyclocross frames and forks

Side by side, the two tyres are quite obviously aimed at different conditions.

They are both tubeless, and they are a doddle to fit on the WTB Frequency rims, which is what you would expect when using components from the same maufacturer. More on this below.

The WTB Riddler 37c weighs 455 grams on average:

Riddler 37c being weighed at 448 grams

Riddler 37c being weighed at 462 grams


The WTB Cross Wolf (with some dried-on WTB TCS sealant) weighs on average just under 400 grams. So we are talking about an extra 110 grams for the pair of WTB Riddler 37c. Worth it considering the advantages in terms of speed.


WTB TCS: Tubeless Compatible System

I have no qualms about WTB quality, the rims are strong and light, they have stayed true throughout the season, have survived some abuse, and have all the technological properties you would expect in a modern rim.

Most importantly though, these rims are tubeless: they have a UST compatible rim profile, which when using WTB TCS rim tape in the appropriate width (24mm wide for a 19mm internal width rim), achieves a burp-free seal, yet still allows tyres to be mounted by hand, without the need for levers.

WTB calls this tubeless tyre and rim combo TCS: tyre and rim made to work together, and I certainly stand by that claim.

The TCS system in full view: WTB Frequency i19 Team CX rims and WTB Riddler 37c tyre
I have consistently run the WTB Cross Wolf tyres at 20 to 25psi (and sometimes 19psi at the front in a couple of races) and they never once burped.

You might be wondering how easy are these tyres to fit and inflate.

First of all, I always fit all tubeless tyres by hand, without levers.
I then inflate them without adding sealant, but by simply wetting the beads and rim walls using a water spray bottle.
Finally, I make sure the beads are not on top of the valve.
This normally takes a two or three minutes.

Now it's the time for the trick you were all waiting for: the inflation process.

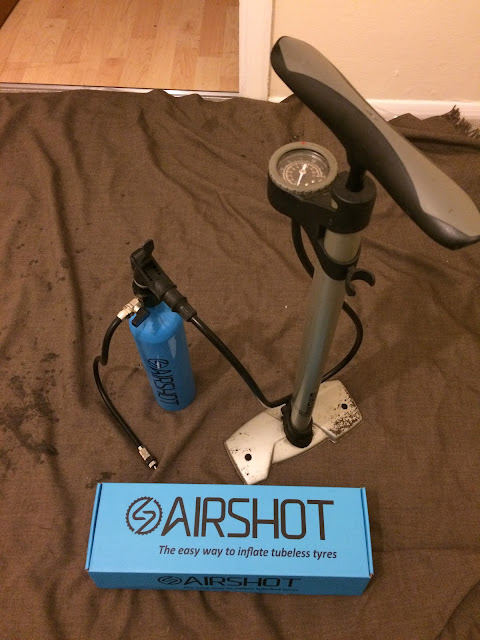
Having experimented with different techniques in the past, I have now settled with the only one absolutely guaranteed to work. Airshot!

Airshot next to my trackpump, ready for use
Airshot ready for use

It just works! First time, every time!

Simply inflate the Airshot bottle to 120 psi then open the valve: this will inflate a 700x37c tyre such as the WTB Riddler 37c to around 40 psi, and at the same time start to seat the beads well.

To fully seat the beads, I recommend proceeding by inflating the tyre to 60 psi.
Once the beads are fully seated, you can deflate the tyre and inject the sealant through the valve (removing the valve core first!) using a sealant injector.

Within 20 minutes, starting with a bare rim without tape, using TCS parts, you can have a fully seated, sealed, reliable tubeless wheel and tyre system. 


P.S. Trick to set the tubeless rim tape

When I first install a tubeless rim tape, I certainly make sure it adheres well to the rim bed, covers the rim from wall to wall, and all air bubbles are pushed out, while really pulling on the tape in order to stretch it into place.
But the one trick I have learnt, is to fit a standard inner tube and the tyre of your choice, before injecting the sealant.
By inflating an inner tube to around 60 psi or more, the tape will adhere much more securely to the rim, and you will appreciate this when the time will come to replace a tyre or refresh the sealant, since the rim tape will not peel off the rim when using a lever to remove the tyre.

4 Feb 2017

How to transport your laptop by bike


Although you can carry a laptop on a bike in a courier bag or a backpack, to have such a heavy load on your back for the entire journey it's a bad idea.

In my experience, using a pannier bag is the best way to carry heavy loads, such as a laptop, for journeys longer than a few minutes.


Initially I was tempted to order the laptop specific bag made by Altura, the Altura Urban Dryline Briefcase 15It's a slimline, sturdy and well padded laptop specific pannier bag, which to be honest, would still be my bag of choice for transporting my Dell Precision 15" laptop.

But since I already own a set of Altura Dryline 32 pannier bags, which are a similar size to the briefcase, all I needed was to protect the laptop inside the bag during transport.


Although the Dryline 32 panniers are pretty strong and durable, they are also lightweight and don't provide any padding. This is by design, since they are meant to be carrying items for touring, which are normally not delicate, and therefore priority is given to capacity and weight rather than protection from accidental knocks and bumpy rides.

The decision was then made to buy a laptop sleeve, and after browsing the net for a good snug fitting one, I purchased a Case Logic TS115 in black.


The sleeve fits my laptop perfectly, preventing unwanted movement when inside the pannier.
It is also well padded all round and therefore protects the screen very well.

The Case Logic TS115 fits the Altura Dryline 32 perfectly too


A fantastic combination, providing a very slim profile, perfect for commuting.

11 Jan 2017

Exercise routine for cyclists - Day 1

Today I started my 3 day exercise routine in preparation for the cyclocross race on 22nd January in Abingdon.

With just over a week to go, I need a sure fire way of getting my fitness back after the joys of Christmas and new year took a toll on me.

About a couple of years ago I invested in a set of exercise equipment called ViPR (
official page here). I bought the 4Kg, 8Kg and 16Kg models, second hand on eBay. 

Here is what the Day 1 routine looks like using an App called VT ViPR:


9 Jan 2017

Slave to the weather forecast

Today I looked at the weather forecast for the next few days.
As you can see from the pictures below, the weather this week seemed a lot milder then the past two weeks.


Rain forecast for most of the week, and temperatures well above zero until Friday.

This made me think that maybe I was better off swapping back my old commuter tyres, a set of Schwalbe Marathon Supreme, in place of the Ice Spiker.

So I started the process of changing tyres which I am not very fond of, especially considering I am still running innertubes on my commuter.

The process was quite laborious but eventually the Supreme are back on, and the Ice Spiker back in the cupboard.

I took this opportunity to assess wear and tear on the studs in the Ice Spiker. 
As you can see from the pictures below, the wear is fairly consistent front and rear, with the centre studs obviously quite worn out yet still able to provide some bite in the ice, and the studs on the side knobs instead still looking pretty good.

I 


Now I was quite happy to return to a more comfortable and smoother ride thanks to the slicker tyres.

And then this happens!


So now I booked some time in the diary to swap the Ice Spiker tyres back on the commuter on Tuesday, ready for the commute on Thursday!!

Sometimes I hate the weather forecast!

6 Jan 2017

The Ice Spiker are back for 2017

The temperatures here in the South East of England have again dipped below zero, and I decided the time had come to prepare my commuter for the imminent snow.

I dug out my old set of Schwalbe Ice Spiker from the shed, and fitted them just before the the first commute to work of the year 2017.


The first time I used the Ice Spiker was in 2010.

Since then, I have only used them a handful of times in 2012 before investing in a set of Schwalbe Marathon Winter tyres for my folding bike, which I reviewed.
As the winters are getting colder again, I suspect we might see snow this year.
It normally snows around February in the South East of England, but a few days ago the ground was so slippery I could not ride down my driveway without sliding on black ice.

Fortunately I remembered to set the tyre pressure correctly and these tyres only add about 5 minutes to my 20 minute commute, which I personally think is perfectly acceptable.